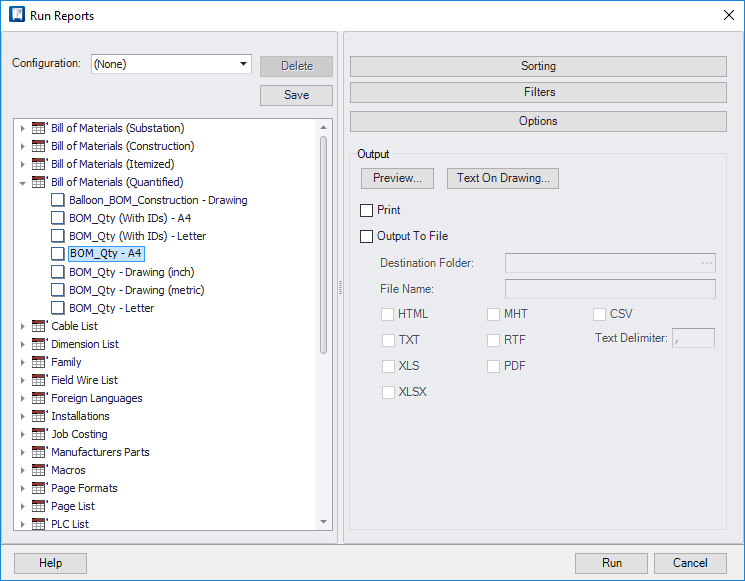
| Sorting
|
Displays the
Sorting dialog which lets you sort the fields associated
with the report.
|
| Filters
|
Displays the
Filtering dialog which lets you define what is included or
excluded on a report.
|
| Options
|
Displays the
Options dialog which lets you define settings that affect
the report content.
|
| Output
|
Select the output type. The following selections
are available (you may select more that one for each report):
-
Preview - Select this button to
display the report on the screen.
Note: If you
have selected one of the
Change Report options to preview,
you will be prompted with the Select Projects for Comparison dialog when you
click the
Preview button. This allows you to
compare data between two different project revisions.
-
Text On Drawing - Displays the
Text on Drawing dialog, which enables you to place the
report on a drawing page.
Note: To place a
report on a drawing page, you must use a report template that is designed for
this purpose. In the pre-configure reports, these are indicated by the word
"-Drawing" in the report name. For example, BOM_Itemized - Drawing (metric).
-
Print -This check-box will send the
report to a printer. A printer selection dialog will appear when you run the
report.
-
Output to File -This check-box will
cause the report to be stored as a file. When you select this check-box,
additional fields and check-boxes become active. Use the
Destination Folder field to browse to
the folder where you wish to store the file. You can also press the
PW button to generate the report to a
ProjectWise folder. Check-boxes for the following file formats are available
(you may select more that one for each report):
-
CSV - Generates reports in the
Comma-Separated Variables format. When this check-box is selected, the
Text Delimiter field becomes active
which allows you to define the character that will separate values in the
report.
-
HTML - Generate reports in HTML
format. A
Files subdirectory is created for
each report to hold images and other files related to the report.
-
TXT - Generates reports in ASCII
text format.
-
XLS - Generates reports in the XLS
format, compatible with Microsoft Excel spreadsheet software.
-
MHT - Generates reports in the
MHTML archived Web page format. This combines a web page and associated images
into a single file which can be viewed using Internet Explorer.
-
RTF - Generates reports in the
Rich Text Format, which is compatible with Microsoft Word and other word
processors.
-
PDF - Generates reports in the
Adobe Acrobat Portable Document Format.
|
| Run
|
Generates the selected reports.
|